
BALL-JOINTED DOLL Underwear TUTORIAL

The process of making an adorable lingerie set for one of my latest dolls is one of the most exciting parts of doll making for me. Making intricate garments, embroidering, adding lace and beads - the possibilities are endless!
YOU WILL NEED THE FOLLOWING
For sewing patterns, you will need a measuring tape.
I chose a very thin, slightly stretchy synthetic fabric.
Lingerie decorations such as lace and beads.
Straps are made with narrow ribbon.
A thin wire, a thin nylon string (optional) - to hold the shape of the bra.
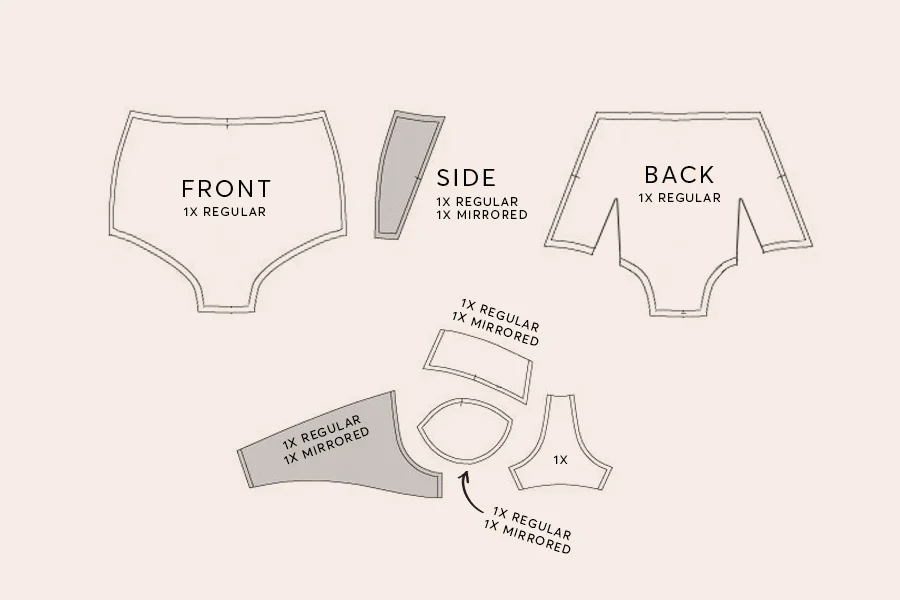
The pattern

I found a pattern on Pinterest with slight modifications. To adjust the pattern to fit your doll, measure the doll with measuring tape and alter the width or length.
The width and length of the front and back are measured.
PATTERN FITTING
Make further adjustments if necessary. Cut out the adjusted pattern and see if it fits your doll.
THE FABRIC IS CUT
Cut the fabric parts when the pattern fits perfectly.
BOTTOM SEWING
Before sewing all the parts together, connect and stitch up the darts (small cuts in the back pattern) to create a rounded shape.
To make it neat and tidy, fold and stitch the edges.
Glue all the parts together, leaving one side unstitched.
If you prefer, you can decorate the edges with lace now, while the edges are still flat and not connected.
When you've chosen a stretchy fabric, sew all the parts together and see how they fit your doll. If you've chosen a non-elastic fabric, make an incision in the back.
Once everything fits nicely, it's time to decorate!
INTERIOR DESIGN
Let your creativity run wild! I like to decorate with lace and beads.
All the edges will be laced.
BUTTON ADDITION

Due to the doll's scale, I'm using beads and loops made from a thin string.
TOUCHES OF FINISH
I'm adding a few white beads and ribbons to complete the bottoms.
FITTING THE PATTERN FOR THE BRA
Measure your doll again and adjust the pattern. Cut it out of paper and see how it fits.
Sew the pieces together after tracing the pattern on the fabric.
To make everything neat, I sew the middle pieces together, then add the sides.
When the fabric is thin, it doesn't hold its shape very well. I'm using thin wire and nylon string to prevent this.
The wire is glued in the middle and the nylon string is sewed along the edges.
INTERIOR DESIGN
CLASP ADDITION
You can use the same system with beads and loops or you can add any clasp that you like. I chose this transparent one, which you can find at any sewing supply store.
THE STRAPS ARE ADDED
The straps are made from ribbon and jump rings to give the illusion that they are adjustable.
Using a jump ring, thread the ribbon through, burn the edges, and squeeze them together. Be careful not to burn yourself! If you don't feel comfortable using fire, you can use glue.
Using the same jump ring, thread another part of the ribbon. This time, make it longer.
Put these straps on the bra and you're done!
If you have any questions, just let me know
EDELWEISS~