

For a BJD, doing a faceup is fun and rewarding. It adds uniqueness and further assists you in bringing the character you have in mind for your doll to life. I've been doing faceups for about ten years, but I don't claim to be a professional face painter. If you're thinking about starting your own faceups, I hope this guide can help.
Tools that are helpful I do have a list of doll face-up supplies onlie that I frequently use. Feel free to look at it and try some of the items I already use and trust.

Cleaning tips:
Winsor and Newton acrylic medium brush cleaner and restorer Rubbing alcohol or isopropyl alcohol (at least 80%) Non-acetone polish remover (unscented and colorless) Dos: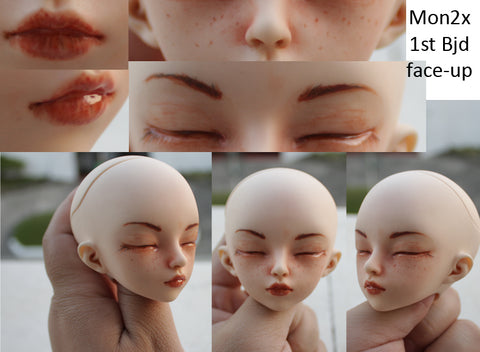
If you use a new product or paint, test it out on the head cap first. Look at drawing references for drawing lashes and eyebrows. Use water-based items (acrylic paints, chalk pastels, acrylic gloss). Seal your layers to save your work.
Working in layers When someone says, "work in layers," they mean that you do each part of the faceup in parts. Don't use nail polish, sharpies, human makeup, or any products with oils in them. Also, don't forget to use your sealant. A faceup that isn't sealed won't last. Additionally, you build from the bottom of your faceup to the top. The basic idea is to start with basic shadows and pastel colors, move on to darker pastels and watercolor pencil work, add some acrylic, and finish with gloss. People may start with slightly different colors.
Get an idea Before you even pick up a brush, you need to know what you want to achieve. I think it's a great idea to look at makeup looks and build from there. I suggest that you sketch it out if you want something more specific. I have previously colored in my idea on blank makeup templates.
Also, make a list of the supplies you might need. Do you intend to desire shimmer? The Pearl Ex must then be pulled out. Do you want to add some finishing touches? Then you might want to get some nail art deco. Before you begin, get your supplies ready.
Hold on a second, but first, let's spray. If you're ready to jump in headfirst and get to work with your pastels, HOLD ON A MINUTE. First things first, make sure your head is spotless. Before beginning a new faceup, you should clean off any previous faceups from your doll.
Let's say you ordered a blank dolly and received it in brand-new condition. You still want to make sure that nothing is on the dolly, so use a magic clean eraser to go over it. Make sure the magic clean eraser doesn't leave any dust on your dolly after you've gone over it with it.
Spray some sealant on that bad boy or girl now that your doll is completely clean. Before beginning any work, allow the head to dry for at least 15 to 30 minutes.
Preparing Pastels I know you're excited to start your first faceup, but let's talk about pastels first. Prepare your pastels, a paper plate, and an X-Acto knife once you have an idea of the colors you'll need.
You will make shaving piles on your plate by lightly scraping the pastels at an angle. If you don't want to accidentally tip this plate over and send your pigment flying, be very careful where you place it. You can achieve the placement of colors and shades by slicing the pastel into small piles of powder and applying it with dry brushes. Having a cotton ball on hand for blending is also helpful.
Basic shades and shadows Are you prepared to begin? How do you even begin? Since we are working in layers, we must begin with the ground level. shades and gloom. Do you recall the pastels that you shaved down? It's time to start applying color with your brush.
In this first layer, a lot of what you do is just groundwork. Color the cheeks and use some shadow to give the eyes some depth. Start that lip foundational color as well!
If you want a solid idea of where to place some fundamental shadows, you should also check out some videos on contouring.
Faceups for Beginners, Tips and Guides, is a fun and rewarding BJD faceup. It adds uniqueness and further assists you in bringing the character you have in mind for your doll to life. I've been doing faceups for about ten years, but I don't claim to be a professional face painter. If you're thinking about starting your own faceups, I hope this guide can help.
Tools that are useful Everything I own is on the table!
I do happen to have a list of faceup supplies on Amazon that I frequently use. Feel free to look at it and try some of the items I already use and trust.
Chalk pastels, watercolor pencils, and acrylic paint Gloss (acrylic-based) sealants: Q-tips, cotton balls, and magic clean erasers (see the article for recommendations) can be used for cleaning.
If you use a new product or paint, test it out on the head cap first. Look at drawing references for drawing lashes and eyebrows. Use water-based items (acrylic paints, chalk pastels, acrylic gloss). Seal your layers to save your work.
Working in layers When someone says, "work in layers," they mean that you do each part of the faceup in parts. Don't use nail polish, sharpies, human makeup, or any products with oils in them. Also, don't forget to use your sealant. A faceup that isn't sealed won't last. Additionally, you build from the bottom of your faceup to the top. The basic idea is to start with basic shadows and pastel colors, move on to darker pastels and watercolor pencil work, add some acrylic, and finish with gloss. People may start with slightly different colors.
Get an idea Before you even pick up a brush, you need to know what you want to achieve. I think it's a great idea to look at makeup looks and build from there. I suggest that you sketch it out if you want something more specific. I have previously colored in my idea on blank makeup templates.
Makeup face charts, face charts, and face drawings on Google's blank makeup template. Also, figure out what supplies you might need. Do you intend to desire shimmer? The Pearl Ex must then be pulled out. Do you want to add some finishing touches? Then you might want to get some nail art deco. Before you begin, get your supplies ready.
Hold on a second, but first, let's spray. If you're ready to jump in headfirst and get to work with your pastels, HOLD ON A MINUTE. First things first, make sure your head is spotless. Before beginning a new faceup, you should clean off any previous faceups from your doll. You can learn how to do that by reading my article about cleaning BJDs.
Today, I used a Tamiya sealant!
Let's say you ordered a blank dolly and received it in brand-new condition. You still want to make sure that nothing is on the dolly, so use a magic clean eraser to go over it. Make sure the magic clean eraser doesn't leave any dust on your dolly after you've gone over it with it.
Spray some sealant on that bad boy or girl now that your doll is completely clean. Before beginning any work, allow the head to dry for at least 15 to 30 minutes.
Preparing Pastels I know you're excited to start your first faceup, but let's talk about pastels first. Prepare your pastels, a paper plate, and an X-Acto knife once you have an idea of the colors you'll need.
You will make shaving piles on your plate by lightly scraping the pastels at an angle. If you don't want to accidentally tip this plate over and send your pigment flying, be very careful where you place it. You can achieve the placement of colors and shades by slicing the pastel into small piles of powder and applying it with dry brushes. Having a cotton ball on hand for blending is also helpful.
Basic shades and shadows Are you prepared to begin? How do you even begin? Since we are working in layers, we must begin with the ground level. shades and gloom. Do you recall the pastels that you shaved down? It's time to start applying color with your brush.
In this first layer, a lot of what you do is just groundwork. Color the cheeks and use some shadow to give the eyes some depth. Start that lip foundational color as well!
How to Contour and Highlight for Your Face Shape If you want to know where to put some basic shadows, watch some videos on contouring.
You can spray this layer after finishing your basic shadows or spray the next layer first. Make certain that this initial coat is only a light one.
Starting with the eyes, eye movements are a lot of fun. You can add any necessary colors here. With pastel, you can get into the areas you want to with smaller brushes. Don't forget about the tear ducts either. Apply some light pink to those to give it a more natural appearance. Using a light-colored watercolor pencil, you can also start applying eyelash foundation at this stage. The same applies to where your brows are placed. Draw a line where you want your eyebrows to go with an angle brush and a light color.
The dreaded eyebrows This is a difficult step. There are many ways to draw eyebrows. I prefer to approach problems from the inside out. I also like to start my first hair lines with a watercolor pencil that has been well-sharpened. to get an idea of how the hair on an eyebrow looks, look at pictures of them.
You must strike a balance between your desires. Do you prefer it more cartoonish or extremely realistic? Find a few references online to get an idea of what you like. Also, before you try it on your doll, try drawing them on a sheet of paper. If they aren't exactly the same, try not to get stressed out. Your eyebrows can be sisters, not twins, as I have previously been informed.
After you have drawn it on your doll with a water color pencil, you can either use a pastel and an angled brush to fill in more of the eyebrow with a color that matches your wig. Wait until you finish the next part before sealing.
Work on the lips Smiling says a thousand words! Let's get those lips in shape. I haven't done lip lines in a long time, but there are people who absolutely adore it! Again, it is at this point that you, as the face painter, will take charge and do what you want. I recommend applying acrylic to a very thin brush or a very sharp water color pencil if you decide to draw lines on your lips.
Creating a lip curve has been something I've been enjoying. I draw a thin line at the corner of the mouth with a dark color pencil, usually black, so that the lips can look like they are smiling. It's such a minute detail that can make your lips look different. After all of this work, seal it and get ready for the fun part, the acrylics!
Getting Started with Acrylics A small bowl of water, a paper towel, a plastic pallet, and some Q-tips (dipped in water can help fix small mistakes) are a few things you can keep around when working with acrylics. As long as you have a good brush, acrylics are good for painting fine details. For fine details, I highly recommend the Warhammer brushes. Essentially, any miniature-specific brush works well.
Although, to be honest, I typically thin my paint using only water, I have also used a paint thinner in the past. Because acrylic paint dries quickly, you should only pour a small amount onto a pallet to avoid wasting any paint.
Oh my, eyebrow hairlines, eyeliner, and eyelashes!
It takes time and practice to draw intricate details like eyelashes or eyeliner. You can re-use your trusted sketch paper to practice your lines before applying them to your doll. When it comes to applying lashes, there are so many different styles to choose from. Some people prefer to be very full, while others prefer to be thin, and sometimes less is more.
Additionally, now is a good time to investigate eyeliner videos! If you want to learn how to apply wing liner, makeup tutorials are a good place to start. When working on these pieces, just be sure to use a good detail brush.
Don't be alarmed if you make a mistake! You can make use of a corner of a Mr. Utilize a q-tip or a clean eraser. When one or two of my lashes got too long, I sometimes just quickly shaved it off with a q-tip to match the length of the others.
I would recommend sealing your acrylic at this point because you just completed some serious work.
Check to see if you need more acrylic or pastel.
So far, your faceup looks great! It truly is coming together! Therefore, you must determine whether anything is missing here. Can your doll apply more pastel to specific areas? Exist other locations that require acrylic work? At this point, I typically also consider freckles, tattoos, or birthmarks. Now is the time to add any of those details if you want to! If you make any changes, this will also be the last time you can spray your dolly. Gloss is the next step, and sealing the area after gloss is applied can cause gloss to matte out.
Let's get shiny!
This is the icing on the cake! Here, we can shine up parts with gloss! Lips, eye ducts, eyeliner, and eyelash lines are all good places to use gloss. Keep in mind that gloss will take some time to dry. I typically allow it to fully set and dry for the remainder of the night. The drying time for your gloss can be found on the bottle.
Additionally, after applying gloss, be sure to immediately clean your brush. It is not enjoyable to attempt to clean it after it has dried on your brush.
The question is, "To fake lash or not to fake lash?" Fake lashes are an excellent finishing touch for BJD faceups. However, I don't think they really affect the outcome of a faceup. Although a lot of my dolls don't have false lashes, I think it's a nice feature to have.
Would you like to give it a try on your dollie? Here is what you require.

a set of false lashes (I've bought them from a local drug store and even from a dollar store), white Elmers glue, scissors, and a paper towel. First, measure your bjd eye and cut your lashes to fit. This can be accomplished by cutting the lashes strip slightly smaller and measuring the eye opening with a measuring tape.
Put your glue on a plate or pallet once your eyelash strips have been cut. Apply the glue with your brush to the base of the lash line. You need to carefully insert it into the eye socket next. Pat it flat on the inside of your eye with your brush.
In most cases, I want it to adhere to the flat part of the inner eyeliner. Others, on the other hand, glue the majority of it to the inner socket further into the eye. Choose a location you think looks best. Before reattaching the doll's eyes, give the glue time to work. Again, I usually let it dry completely for about 30 minutes. If necessary, add more glue.
EDELWEISS~
1 comment
This was extremely helpful, ty