Joints are a big part of any doll making process. They were the most intimidating part of the process for me, which is why I never got around to sculpting my first BJD until recently. In this article, I want to do my best to take away some of the mystery behind joints by providing a brief overview of what they are, as well as how you can stitch them together in your sculpture. If you want robust and informative tutorials, consider joining my BJD sculpting masterclass that will walk you through the entire process of sculpting ball-jointed doll from scratch. Including joints!
Is it worth it to sculpt your balls yourself?
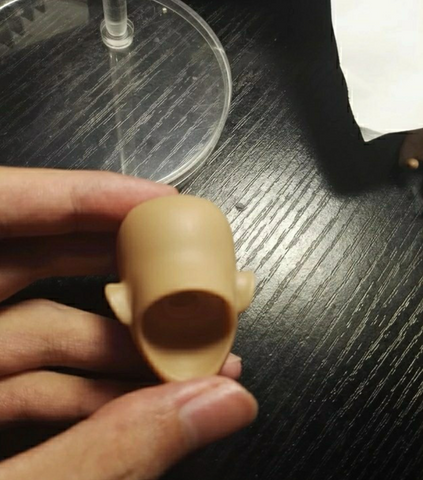
For me, this question is a difficult one. I’ve seen artists who prefer to sculpt balls for joints themselves and those who use premade wooden balls. For my first piece of mine, I used the premade wooden balls from the craft store. While they worked okay and were easy to cut and drill, they were much more fragile than clay would have been, which made me so worried about how I was going to get them attached without damaging them. It took a long time to even get everything to attach properly because I was hampered by the lack of mobility in these pre-made parts. I spent way too much time worrying about getting my product perfect before letting it go out in the world. In that time I could have sculpted my own perfectly-fitted clay balls if only they were easier to work with! Now, when I make something using wooden balls again. This has worked out great every single time!
How to Join Together?
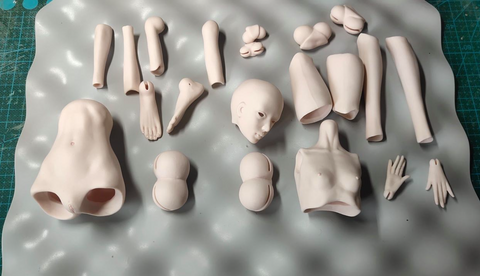
The first step when sculpting joints is to figure out what type of joint you want to sculpt. I prefer poseable dolls so I usually make double-jointed dolls. They can look difficult at first, but once you understand the basics it's not really that hard. When drawing the blueprint, I like to use the circle template that I’m also using to shape my clay balls. If you feel overwhelmed by all my moving parts, you can create some single-ball and double-ball joints on your own.
Putting it All Together
First, make sure the balls are even, smooth and the correct size. Once you've done that, take two of those balls and glue them together. Dab some glue on both balls, then press together for about 30 seconds for a seamless joint. Next, insert this rough joint into a designated doll part, mark the borders where they meet both pieces to guide you as you continue sculpting. These borders will also determine how much clay goes where and will shape the final shape of your joint.
There are two half-circles for the back-end. The lines should touch on the side of the joint. Keep in mind that you'll be able to see if your joints are aligned correctly when testing these later on. Making joints requires a lot of testing, carving and shaping things over and over again until they work properly!
Once you've assembled the guidelines, start adding clay and consistently check for how the joint fits the doll that you are making. If you want video tutorials or step-by-step guides for every single joint, I suggest checking out my BJD sculpting masterclass.
Detailing
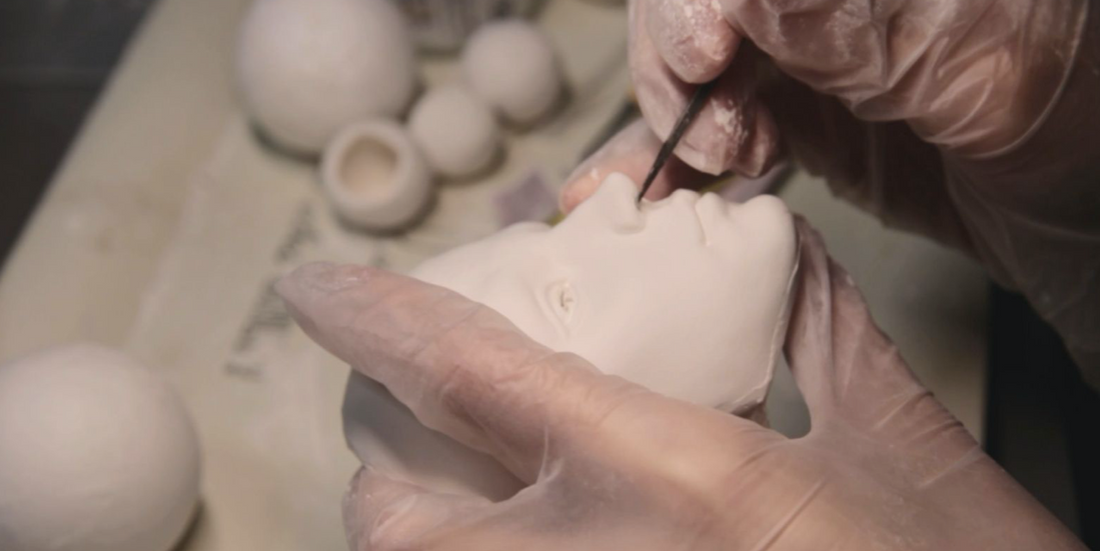
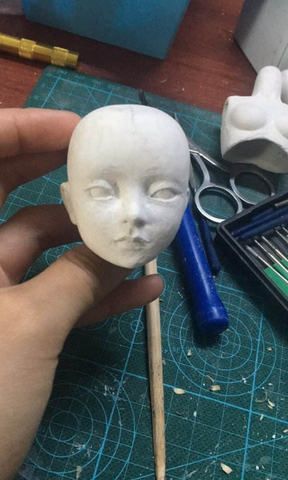
Once you have the basic shape of the joint, it's time to make small adjustments and see how it moves. Also, detailing is a very important part in making joints look cohesive and delicate. I like to find a balance between anatomically correct and visually pleasing detail-work. My dolls always had stylized human bodies so for me anatomy is something that I can change to my liking if needed.
Before detailing a toy with clay, I'll draw out guidelines where I'm going to sculpt. Sculpting in parts is better because you have more control when shaping the clay. Sanding the joint is also really important during the detailing process. Using a scalpel and sanding paper you can easily remove any imperfections from the joints.
I hope my overview has helped to shed more light on ball-jointed dolls. Let me know if you have any questions and feel free to leave them in the comments section. Make sure you sign up for my newsletter below so that you'll get all the new updates on my doll articles and news delivered right to your inbox!
BALL-JOINTED DOLLS: HOW TO SCULPT JOINTS?

Joints are an issue for many people who want to get into BJD making. They're a subject that understandably intimidates anyone with an interest! As someone who's also been intimidated by them, I'm approaching this topic from my own perspective. In this article, I want to provide some fundamental information on the process of designing and sculpting joints for your dolls. In future tutorials and articles, I'll be able to go into more detail and walk you through the whole process of making a BJD jointless doll, including intricate joints!
SHOULD YOU SCULPT THE ART ON YOUR OWN?
The question of whether a ball should be sculpted or bought usually gets conflicting answers. Some artists prefer to sculpt their own balls, while others would rather use premade wooden balls. I can only speak on my experience, and since I've tried both methods, sculpting my own clay balls is more efficient in the long run. Let me explain why. When I first made a ball-jointed doll, I used wooden balls from the craft store. They worked nicely enough and the clay stuck well to them. Once the clay dried around these wooden balls, it was hard to drill into the wood and cut slits for the elastic. The clay was very fragile so I had to be careful about not damaging it as I drilled and cut through the wood myself. It took me a lot of time and effort - probably several hours - to achieve a successful result. And that's only because my first few attempts failed completely. If I'd been using this tutorial from the beginning, it would have gone much smoother and faster since it's designed specifically for working with clay around wooden balls gradiated tips that make this process way easier. Still, when it comes down to it...
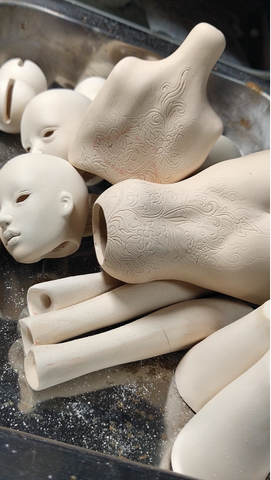
This illustration was designed by one of our talents.
When you're planning to make a doll, it's always best to start with a blueprint. Figuring out what type of joints you want to sculpt is an essential first step. I love designing dolls that have poseable limbs, and as long as you understand the basics of the techniques, making them is pretty easy. If you feel lost or overwhelmed by all the moving parts, it might help to mix up the styles and make some dolls single-jointed, while others are double-jointed.
Putting all this together
1. To make a double joint, you need to glue the balls together with PVA glue. 2. Use your finger drop some glue on one side and let it ooze over until it’s all wet. Then, carefully feed the two halves together, getting the seams to line up and pressing them firmly together. 3. This should leave a uniform ring of contact where they meet. That will be our general shape for this type of joint.
Draw two half circles, one on top of the other. The front and back lines should meet in the side of the joint. If you have any trouble drawing this correctly, don't worry, as it will be easier to tell once you start testing this joint. Joint making requires a lot of carving and sculpting until you get it to work right!
Here you'll find the basic instructions for making joints for my favorite type of doll. Make sure that, as you create the joint, it fits well with the rest of the body - like locating a hand on one side of the arm and shaping a thumb on the other. If you want to see video tutorials and detailed step-by-step guides, take a look at my BJD sculpting masterclass.
DETAILING
Once you have the basic shape of the joint, now it's time to make small adjustments and see if it moves as intended. Detailing can be an important part of making joints look cohesive and delicate. Our dolls were always stylized versions of a human body, so I take anatomy something I can change or modify.
Before detailing a joint, I draw the guidelines where I’ll be applying the clay. If you sculpt in small patches, you can have better control over which parts you shape and where. Once sanding is finished and joints are fully detailed, it will only take a few folds to remove any potential imperfections.
I hope this article has helped you understand ball-jointed doll anatomy better. Let me know if you have any questions in the comments section. To receive a free email subscription for all new articles about my dolls, subscribe below!
EDELWEISS