
Smocking is a type of embroidery. A delightful way of attaching stitches to a garment, while also adding elasticity and fullness. Preparing for smocking starts with some preparations, but the attention to detail and the finished product result in a gorgeous embroidered garment.
This method has been used since the Middle Ages and once helped to create elasticity in garments before elastic was invented. They were used to gather fabric in cuffs, collars, necklines and bodices. Some of these garments can be embellished with beads placed between the pleats and intricately embroidered.


With the use of words, the author shares an example of how Smocking’s origin came about. The old definition for this term is defined as “giving added fullness to the smock, often embroidered with a symbol pointing out what its wearer does”; this definition comes from a shepherd having a crook on his shirt and a carter having an ox-cart or wheel on his shirt.
With the Industrial Revolution, smocking was seen as a decorative sewing technique that would hinder how machinery works. Instead, clothes became looser to fit with industrial advances and now are only used for special occasions.
Today, there are a wide variety of stitches and gathering techniques used in smocking designs. This traditional form of decoration is still popular with today's fashion, and it can also be seen in upholstery.
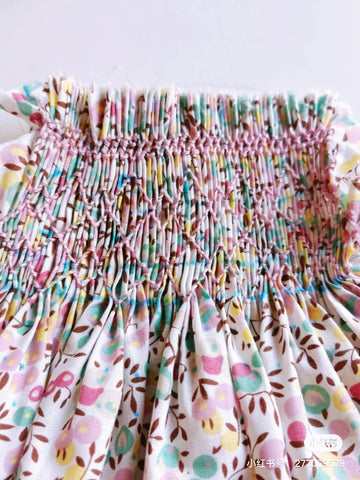
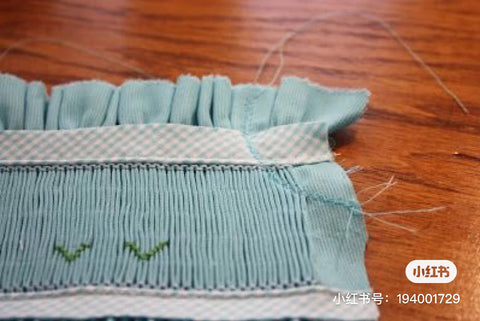
Infant clothing still features the delicate patterns of smocking and can be found decorating christening gowns, along with baby slippers. This dress has a yoke decorated with smocking and heart-embroidered accents.
Smocking is best suited to soft fabric such as cotton, voile, silk and linens. Gingham is the ideal fabric because it is the easiest and most efficient way to create a pattern with smocking. Clothes should be stockinette or thin in order to have an easier time with smocking.
Needles used for smocking and embroidery
Threads are not just used for stitching to complete projects fast, they create detail, texture, dimension and stability. Each fabric requires the use of a certain type of thread in order to give it the right effect. Choose colors that complement each other for balanced designs or accent contrasts for each segment with Perle cotton threads.
This is a three-step process. The first step is to prepare the fabric adequate for stitching, and then gather the thread in one place for stitching. Lastly, you stitch the fabric with a needle to secure it in place.
Following a detailed process is important to ensure accuracy and the best results.
STEP 1 – PREPARATION
“Pre-wash the fabric and press the wrinkles,” says this pattern. Also, for very thin fabrics, add interfacing.
Thorough Explanation of What this Means to the Sewer
Cut the fabric three times the finished width, allowing for the pleating and smocking. Make sure to make your fine fabric at least five times wider than the woven width itself.
A good way to smock is before cutting the fabric, which can make it easier to create openings. It may also be easier to smock a rectangular shape and then cut out armholes, so consider that.
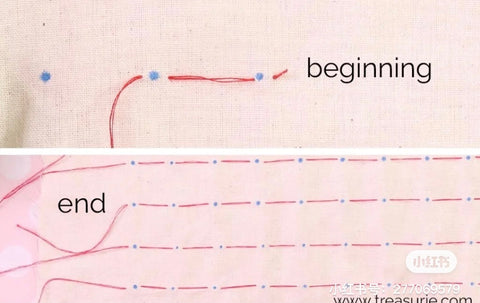
Marking the pleats with dots
Place marks on all the empty spots in a grid to mark pleats in an accurate way, spacing them by exactly the same distance.
This first example illustrates how wide the dots are. With a 1 inch (2.5cm) grid, the pleats turned out very large, which would be useful to practice with after going to smaller pleats.
For fabric with a lot of dots that are too small to write, the pattern can be transferred from the cloth with a smocking iron.
If you need to calibrate a scale, then an older pattern might come with some paper included in the package.
Google Global Student Gathering
Kirschner gathers and pleats fabric after feeding it through its machine for commercial use. Kaisa pleats fabric with a more stylized, machine-created look than that produced by hand.
We found you a new fabric that feels like silk
Fabric with swirls and lines, such as ginghams or checkered patterns are a perfect way to start in shirring because the threads and spots can help you avoid having to make marks.
Before you begin marking dots for the pattern, you need to find the area to be smocked first. Finding a marked area is easy with Copymatic.
Stitching the Dots- How to generate content
Tie the thread of the fabric around the last tooth and weave it in a loop from dot to dot.
Know what knots can cause a rip and how to fix them
To create a decent blog post, do not write under the dots, move on to the next dot.
However, you should keep the pattern for your dots even to prevent lumping of them together.
When knitting a scarf, separate rows are started and stopped with each break being highlighted with a different color.
Cop
Knit loops onto an edge, going to the same side they came from. Then go back and through, to the other side of the loop that didn’t go over the edge. You will see two loops on each side of your piece.
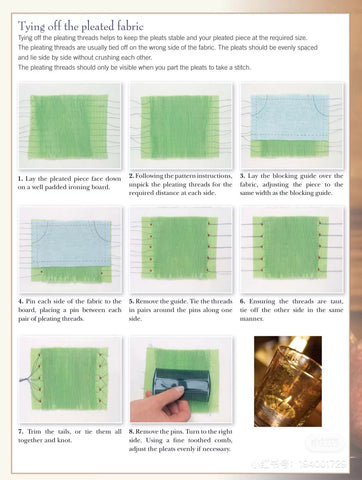
Evenly space the pleats and when you are satisfied with the spacing, tie the threads off in twos at the loose end.
In order to make the embroidery easier, you should leave pleats a little room to breathe.
With this technique, you’re ready to sew on your embroidery. You will be amazed how this gathers up the fabric into pleats and valleys.
If you have many pleats in your design, there might be a more efficient way to mark those dots than painstakingly outlining every one of them.
If you use a grid, the garment will look cleaner on the underside. With this method it is important to use chalk or a pen that will easily come off.
The space between the rows and columns were ¼ inch and ½ inch across, respectively. The spacing was small in regards to heirloom smocking, but this is a common size. The new grid lines are only 3mm wide.
With its grid system, you can easily stitch up and down along the lines to create the perfect pleat.
After gathering up your gathers, it's important to find a way to evenly distribute them across the skirt so you don't have any wrinkles or digging in corners.
DEPTH - When you have pleats or clusters of pleats, take a shorter stitch through the top. If you have deep pleats, take the short stitch through a short way down.
However, you should skip the first row of gathering stitches because this will give you a guide for the top row, and keep the pleats tightly wound.
Position - Either skip the first 3 pleats for a seam allowance or allocate a seam allowance before you start the gathering.
MARK CENTER - A small marker stitch in the center is good for symmetrical designs.
This technique uses different stitches in order to create smocking, which is a type of decoration often found in clothing and other textiles. The next section will show you various stitches that can be used to create this design.
BEGINNER STRETCH
DIY Simple Shorts Tutorial
First, make sure your needle is sewn closer to the back of the fabric in a valley before you start stitching. Hold the needle at a slight slant while seaming to create volume in your seams.
Learn how to write great blog posts
Start with a row of pleats. The first stitch is the "Outline stitch", which will hold the top of the pleats in place while you're working with them.
Use the pre-made stitch patterns to make patches; these range from beginner to more complex ones. They're a good place to start in order to create beautiful smocked one-of-a-kinds.
Practice brings expertise, so start your project with something simple. Gingham fabric or regularly spaced polka dots would be an easy place to start.
Some patterns repeat themselves by folding in half and sewing the added pleats. Make sure you have enough multiple folds to finish the pattern.
A guide line or stitch line is created with running stitches or stitches. This is important as when and where to place them in the pattern.
STEP 5 - FINISHING
After you have completed your stitches, running stitch lines should be removed by pulling them through in a high contrast thread. The remaining stitches will then release the pleats and improve the design.
Four easy stitches are a good way to get started with making smockings
How to baste a bra without a needle and thread
Where can I find cable stitches?
Why your dress has a voluminous neckline
Diamond stitch
Stitch are the underdogs of the denim world
In order to keep the top of the shirt from separating, the pleats should be stitched at the bottom left corner of the garment. This keeps them placed and prevents them from falling off.
THE DOT TO STITCH
First, bring your needle up from the back on the left side of the first or third pleat. Then, work smocking stitches from the left to right!
Sewing a pleat means sewing a fold in the garment by going from right to left at an angle upward.
Learn what happens when the thread breaks
Just Another Day In The Life
Cable stitch produces an attractive, thicker stitch.
Working from the back to the front, insert your needle between the left side of a pleat and the first or third pleat; then start stitching from left to right.
Threading the needle in alternating directions gives this stitch a nice, interlocked look.
Learn the secrets of successful pleat management.
A double cable is stitched when two rows are stitched next to each other.
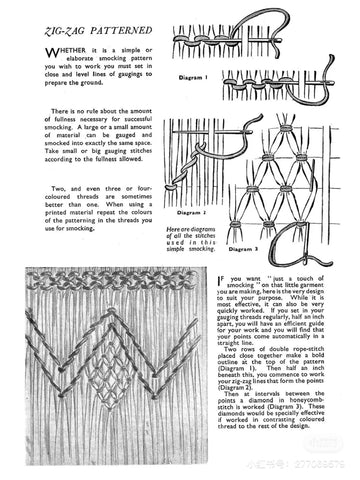
Trellis stitch forms the diamond shapes that are found often in smocking, a fabric-stitching technique that professionally reverses rows of woven fabric to make a garment. The trellis may be different sizes depending on how many stitches are used for each side of the trellis. Three, four, five or more stitches are possible.
The American smocking style of sewing is a different design than traditional English smocking that uses different techniques and is worked on the back of the fabric.
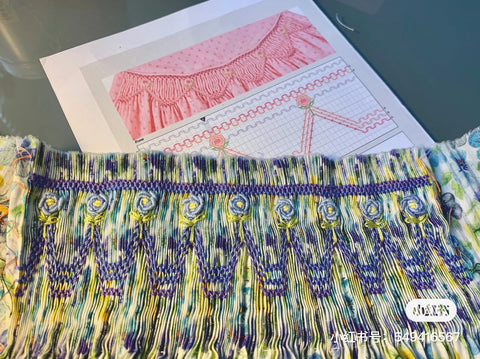
Elaborate patterns are drawn up on the dotted grid with pleated effects on the front of the garment.
This style of smocking started becoming popular in the 1970s.