
Instructions to Make a Needle Felting Creature: A Bit by bit Guide
Figure out how to make a needle felted animals with this aide for fledglings and video instructional exercise.
Needle felting is a tomfoolery make that is not difficult to learn, and needle felting creatures are a most loved subject. They can be charming, peculiar, childish, or even shockingly reasonable. this article gives bit by bit guidelines to how to do needle felting creatures.
Instructions to Make Felt Creatures for Fledglings
Fundamental needle felting is easy to learn, and starter units from make stores give every one of the provisions you really want to begin, including the unrefined components for felted fleece. Some felting fleece creatures are more mind boggling than others, and making reasonable faces and subtleties takes some training. In the event that you're beginning with needle felting, edelweiss day guides students through the most common way of making a basic needle felted pig in this class.
Whenever you've taken in the essentials of how to do needle felting creatures, you should attempt more perplexing plans. The essential development of 3D felted animals is comparative, whatever the creature: think, a middle with four legs and a head joined, perhaps with ears, a tail, and a nose for detail. Varieties and explicit subtleties will differ, however the center standards are something similar and can be adjusted to different creatures.
This bit by bit guide strolls you through the method involved with making a needle felted canine.
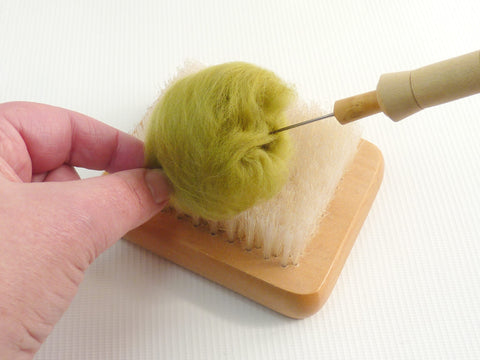
Stage 1:
Accumulate Your Provisions
To make a needle felted canine you will require:
A felting cushion
A felting needle (38 or 40 check)
Pipe cleaners
Sharp scissors
Center fleece
Dark fleece
Pink fleece (discretionary)
Make eyes or globules
2 straight pins
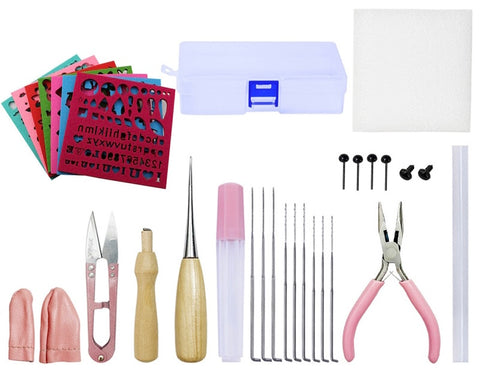
Needle felting kit for beginners
Stage 2:
Make the Head, Gag, and Nose
Take a line cleaner and crease one end over about an inch so you have a smooth end. Take a touch of fleece and extended it out between your fingers to far it out. Beginning mostly down the line cleaner, fold the fleece over, keeping it tight and smooth. When you arrive at the finish of the line cleaner, wrap the fleece down to where you began. Continuing to go like this until you have a smooth, fleece covered pipe more clean. The smooth finish of the line cleaner will turn into the nose.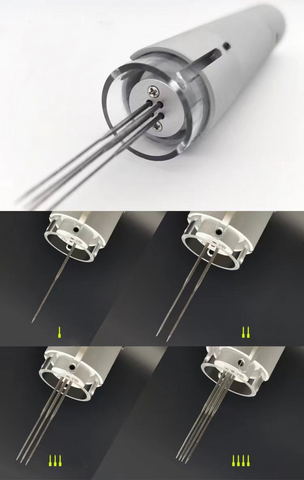
electric needle felting machine(One hour of work reduced to 15 minutes)
Take a touch more fleece and wrap it firmly around your pointer, then take it off. Jab the finishes a little with the needle to tie the strands together.
Append the ball you've quite recently made to the felt-shrouded pipe cleaner to connect it, and afterward fold it over, getting it at the two finishes.
Taking a more modest piece of fleece, rehash this cycle to make the nose, folding it over the finish of the line cleaner and joining it to the wad of the head by jabbing with the felting needle.
Shape the head and nose as you go to make the ideal shape for the sort of canine you're making.
To make the nose and mouth, take a smidgen of dark fleece and needle felt it onto the nose and head perfectly positioned.
Stage 3:
Add the Eyes
This is my tutorials about :how to make needle felting animals'eyes
You can utilize fleece, globules, or specialty eyes. Assuming that you really want to add paste to sparingly append them, use it. In the event that you have create eyes with a screw or bolt, you could have to clip a little opening in the right situations prior to placing in the eyes. Right now you could likewise add somewhat more fleece to make a temple over the eyes.
Stage 4:
Make and Append the Ears
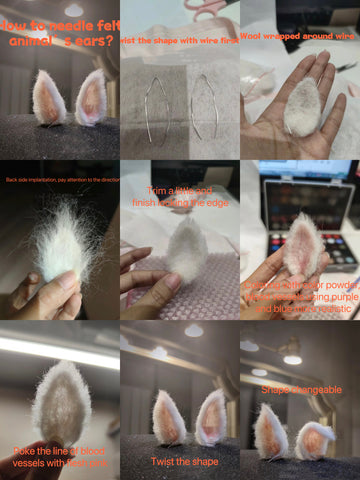
my tutorial:how to needle felt animals' ears
Needle felt two three-sided molded ears. Leave one edge of every ear battered as this will be the edge you join to the head. You could add a bit of variety, like pink, at this stage.
Connect the ears to the head, utilizing pins to get them before you start jabbing the filaments together assuming you really want to.
Stage 5:
Make the Body and Append the Head

To frame the body, take a roll of fleece and roll it up, jabbing as you go to interface the filaments. Make a point to jab each finish to neaten up the filaments.
To connect the head, trim the line cleaner down. Crease the end over to make a smooth end. With your slight, sharp scissors, cut a long opening into the center of the middle, in the position where you need to sit the head. Embed the line cleaner to join the head.
Close up the hole between the head and the body by adding somewhat more fleece and needle felting it all together.
Stage 6:
Make the Legs, Paws, and Tail

Cut five line cleaners (four for the legs, one for the tail) to a length somewhat longer than you maintain that the legs and tail should be. Crease north of one finish to make a smooth end. Fold a limited quantity of fleece over the line cleaner similarly that you did in sync #2. Rehash for every one of the five line cleaners.
Taking four of the fleece covered pipe cleaners, crease one finish of each over to frame a paw. Cover that region with a touch more fleece and join it by jabbing with the needle. On the off chance that you might want to get significantly more itemized right now, structure a few little toes and connect them to the paw, and add a variety to the lower part of the paw to make paw cushions. This is fairly a fiddly step, so it tends to be skipped on the off chance that you're not worried about having an exceptionally point by point creature. In any case, in the event that you're needing to propel your needle felting abilities and make sensible creatures, this is a smart idea.
Stage 7:
Join the Legs and Tail
Place the legs in the right positions and, adding a smidgen more fleece at the mark of every inclusion, join them to the body by jabbing the needle softly.
To add the tail, make a little cut in the canine's rear and supplement the tail inside. Add somewhat more fleece and jab it with the needle to streamline things.
Additional Felting Creatures to Make
Edelweiss